Can I use the file from a USB drive?
Yes. WZIP can live on a USB drive: plug it in, open the browser, load the file, and continue with your workspace.
Docs
A practical guide to using the portable app for invoicing and reporting: local browser data, safe ZIP exports, and operational best practices.
A portable workspace for quotes, invoicing, and reporting for small merchants and small businesses that want clear visibility without adopting a full ERP.
This app is designed for people who currently work with files, spreadsheets, and manual processes, and need a simpler way to manage customers, items, quotes, invoices, payments, and reporting. It runs in the browser, keeps data local, and lets you carry your workspace as a portable ZIP file.
The name Quote2Invoice reflects the core flow: from quote to invoicing, with follow-up on open and overdue balances.
The goal is not to replicate a full enterprise ERP. The goal is to give small operations a practical working tool: create invoices, track what is still open or overdue, reopen work anywhere, keep local control over data, and avoid server or database complexity.
Structured reporting is where the workspace adds the most value. Reports such as open invoices, overdue invoices, and aging are much easier to keep consistent over time in one workflow.
Built for
Small merchants, small businesses, and teams without a real ERP.
Main jobs
Quotes, invoicing, payments, and reliable receivables reporting.
By design
Portable, local-first, file-based, and not a full ERP.
Everything begins with a single step: opening your workspace.
To access Quote2Invoice, open the app and sign in with your Google account. The login step is mandatory — it is the gate that lets you enter the workspace. At this stage, Google is used solely to identify you across sessions: no invoicing data is transmitted to any server, no document leaves your device, and no cloud storage is involved. Your data lives entirely in your browser's local storage and travels only when you explicitly export it as a WZIP file.
The reason a login is required even for a local-first tool is forward compatibility: future premium features — including automatic cloud backup, cross-device sync, and team collaboration — will be tied to your account. Signing in now means your workspace identity is already in place when those features become available.
Once you are signed in, the app presents three entry paths. If you are starting fresh, choose Open clean workspace: you get a blank local workspace ready for your real customers, items, and documents — no sample data, no noise. If you want to explore the product first, choose Enter Demo: a pre-filled dataset with customers, items, quotes, and invoices loads instantly, letting you navigate every feature without committing to real data. If you are returning from a previous session, choose Import WZIP: this reopens your saved portable workspace file exactly where you left off.
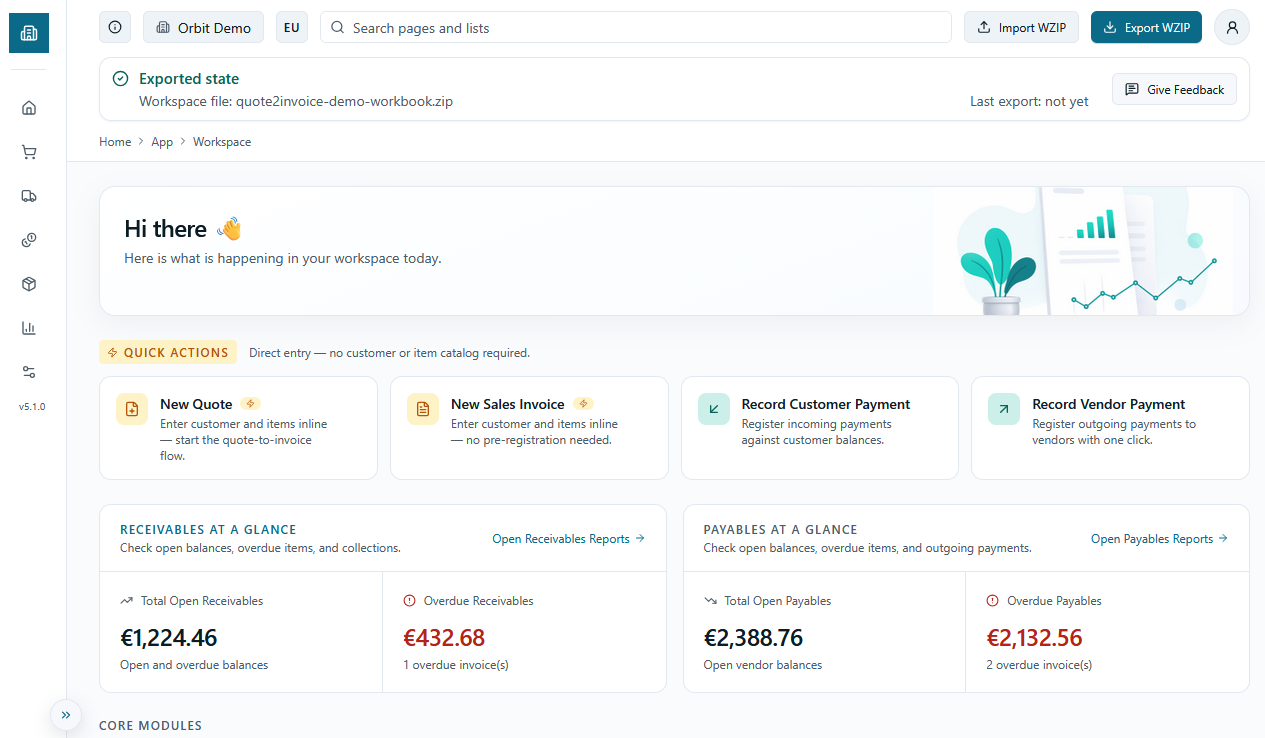
After the entry path resolves, you land on the Dashboard. This is the operational hub of the app: it shows open invoices, overdue receivables, top customers, and gives you direct access to every document type. From here you can navigate to Sales, Purchasing, Inventory, and Reports at any time.
Setup is the control panel of your invoicing workspace. It must be filled in carefully before you issue your first document.

Complete setup before creating any document. Data entered here appears on every PDF printout.
Workspace Setup is the central configuration that every process in the app depends on. It is not an optional screen: every PDF printout, every issued invoice, and every generated document pulls its data directly from what you enter here. An incomplete or careless setup means fiscal documents with wrong data, missing headers, or inconsistent numbering — errors that propagate silently across the entire workspace.
The first section, Company Details, collects the information that appears on every printed document: company name, full address, postal code, city, country, phone, email, and website. You can also upload your company logo in PNG, JPG, or WebP format — it is embedded directly in the PDF of every invoice and quote. The VAT or tax registration number field is what appears in the legal header of your documents, so it must be entered exactly as required by your country's regulations. The Localization field (EU or USA) and Currency (EUR or USD) determine how numbers, decimal separators, and currency symbols are formatted throughout the workspace.
The second section, Tax and Documents, controls how taxes are calculated. Set the tax regime to EU_VAT for European entities, or US_SALES_TAX for the American market. The calculation mode determines whether prices entered on items already include tax (TAX_INCLUSIVE) or are net of tax (TAX_EXCLUSIVE) — this setting is reflected directly in the totals of every document. The default VAT rate is the one automatically suggested when you create a new item or document: pick the rate you use most often to speed up data entry.
The third section, Number Series, defines the prefixes and counters for every document type: sales quotes, sales orders, provisional invoices, posted invoices, customer payments, and purchase invoices. Each prefix becomes part of the document number — for example 'INV-' generates invoices like INV-0001, INV-0002, and so on. The app shows a preview of the next number that will be assigned, so you can verify the series is correct before saving. Changing the prefix after you have already issued documents does not modify existing numbers, but can create gaps in the series — it is best to define it correctly from the start.
Once setup is complete, save with the Save All button in the top-right area. Changes take effect immediately and apply to all documents created from that point on. Remember that setup data is part of the WZIP file: if you export your workspace after configuring it, everything is included in the portable file and reloads intact the next time you open it.
Master data is the foundation on which every document in the workspace is built. Customers, items, and vendors should be set up before creating quotes or invoices.
The customer registry is found under Sales > Customers. For each customer you can record their name, city, state code, country code, phone, email, and tax registration number — this data is automatically carried into the header of every quote, order, and invoice issued to that customer. The Payment Terms field (NET15, NET30, NET45, DUEONRECEIPT) sets the default due date for that customer's documents and feeds directly into aging and overdue invoice reports. The Blocked field lets you disable a customer without deleting them: existing documents remain intact, but the customer cannot be selected on new documents.
The item registry is found under Inventory > Items. Each item has an identifying number, a description, a category code, a base unit of measure, a unit sales price, and a unit cost. The unit price is automatically suggested when you add the item to a quote or invoice — you can always override it on the document, but starting from an accurate price list in master data avoids repeated mistakes. The inventory quantity is an informational field that lets you track stock without managing a full warehouse. Items also have a Blocked field to exclude them from selection without having to delete them.
The vendor registry is found under Purchasing > Vendors and uses the same fields as customers: number, name, contact details, tax registration number, and payment terms. Vendors feed the app's lightweight purchasing flow — provisional purchase invoices and related cost management. If you do not have an active purchasing flow, this section is optional and can be populated later.
Well-maintained master data makes a concrete difference to the quality of issued documents. Every field filled in accurately — especially company name, tax registration number, and payment terms — is reflected directly in headers, due dates, and reports. It is good practice to create at least your main customers and items before issuing the first real document.
Quote2Invoice covers the entire sales cycle in a linear flow: quote, order, provisional invoice, posted invoice, and payment. Each document builds on the previous one and carries its data forward automatically.
The entry point of the sales cycle is the Sales Quote, found under Sales > Quotes. Each quote requires a customer, a document date, a due date, and at least one line. Lines include an item (selectable from the item registry), a description, a quantity, a unit price, a per-line discount percentage, and a VAT rate. Totals are calculated automatically as net, VAT, and gross. The Invoice Discount % field applies a document-level discount before the final calculation. Notes are optional but useful for customer-facing communication. The quote remains editable until it is converted.
The Sales Order works exactly like the quote — same fields, same line structure — but includes an additional Source Quote No. field that is populated automatically when you create an order from an existing quote. This traceability links every order back to its commercial offer without losing document history. Orders can also be created from scratch without going through a quote first.
The Provisional Sales Invoice is the working document before final accounting registration. Compared to quotes and orders, it adds automatic due date calculation based on the customer's payment terms — if you set NET30 and today is the document date, the due date updates itself. When adding lines, the Add Similar Line button automatically copies the item, description, unit price, and VAT rate from the last line entered, speeding up entry for documents with repeated items. The provisional invoice is still editable: this is the right moment to verify amounts, discounts, and data before proceeding.
The Posted Invoice is immutable: once posted, no field can be modified. It displays all the data from the source provisional invoice, the posting date, the final invoice number, and the receivable status — Open, Overdue, or Closed — updated automatically based on payments received. From the posted invoice detail you can directly register a payment or open the PDF preview for printing or sending. The ledger section shows original amount, paid amount, and remaining balance in real time.
Customer Payments are registered under Sales > Customer Payments or directly from the posted invoice. The flow requires selecting the invoice to settle — at that point the customer, remaining amount, and due date are auto-filled. You can adjust the amount to register partial payments. Each payment immediately updates the invoice status and feeds into the open and overdue invoice reports. For the purchase cycle, Purchase Invoices follow the same logic but with vendors and unit cost instead of unit price, with a fast-entry variant that allows registering a vendor even if they do not exist in the master data registry.
Fast Invoice is a shortcut for issuing an invoice in a single screen, without going through quote, order, and provisional invoice steps. It is designed for situations where speed matters more than document traceability.
Fast Invoice is found under Sales > Fast Invoices. It creates a standalone document in one pass: enter the customer name (or select them from the registry), add lines with description, quantity, unit price, and VAT rate, and the document is saved immediately. Unlike the full sales workflow, no preliminary documents are required — you go from a blank screen to a numbered invoice in a single step.
Each fast invoice receives a prefix-numbered identifier (FSI- by default, configurable in Setup). The document contains the same line structure as a standard invoice — description, quantity, unit price, line discount, VAT rate, and calculated totals — but exists as an independent record, not as a step in the quote-to-payment chain.
When you are ready to move a fast invoice into the official accounting workflow, you can convert it to a provisional invoice — or to a quote if you prefer to re-enter the standard flow from the beginning. The conversion carries all lines forward. If lines reference item numbers that do not yet exist in the item registry, the app prompts you to confirm their creation before converting.
Fast Invoice is the right tool when: a customer calls and needs an invoice immediately; you are issuing one-off charges that do not require traceability back to a quote; or you prefer to work first and formalize the document trail later. It is not a replacement for the full workflow when you need a complete audit trail from commercial offer to payment.
The purchase flow mirrors the sales cycle on the cost side: purchase quote, purchase order, provisional purchase invoice, posted purchase invoice, and vendor payment. It gives you symmetric visibility into what you owe vendors alongside what customers owe you.
The purchase cycle begins with the Purchase Quote under Purchasing > Purchase Quotes. Like its sales counterpart, it requires a vendor, a document date, a due date, and at least one line. Lines use unit cost rather than unit price — the same structure of description, quantity, discount, and VAT rate, but oriented toward what you pay rather than what you charge. Purchase quotes are optional: you can start from an order or go directly to a provisional invoice if no formal supplier quote exists.
The Purchase Order, found under Purchasing > Purchase Orders, follows the same structure as the quote and includes a Source Purchase Quote No. field that is populated automatically when the order is created from an existing quote. Like the sales order, it can also be created from scratch without a prior quote. The order represents the formal commitment to the supplier before the invoice arrives.
The Provisional Purchase Invoice is the working document where you record the supplier's invoice details before committing them to the ledger. It works like the provisional sales invoice — amounts, costs, discounts, and notes are still editable — and calculates the due date automatically from the vendor's payment terms. Once reviewed, posting it makes it immutable and creates the payable entry in the ledger.
The Posted Purchase Invoice is the definitive record. It shows vendor, posting date, invoice number, totals, and the payable status — Open, Overdue, or Closed — updated automatically as vendor payments are registered. Like posted sales invoices, it cannot be modified after posting. From the detail page you can register a payment directly or open the PDF for archiving.
Vendor Payments are registered under Purchasing > Vendor Payments or directly from the posted purchase invoice. The flow selects the invoice to settle, auto-fills vendor, remaining amount, and due date, and supports partial payments. Each payment immediately updates the invoice status and feeds into the payables reports — Open Vendor Invoices, Overdue Vendor Invoices, and Aging by Vendor. For fast-entry purchasing — when a supplier invoice arrives without a formal purchase order — use Fast Purchase Invoice under Purchasing > Fast Invoices. It works like the sales Fast Invoice: a single screen with no preliminary steps. Unlike the sales variant, it requires a vendor number rather than a free-text name, since vendor identification is needed to link the payable correctly to the ledger.
Quote2Invoice's reports are the financial control panel of your workspace. They show the real-time status of receivables, payables, and sales volume — built directly from workspace data without manual exports. They are updated and improved over time to add new views and refine existing ones.
The Reports Hub is the central access point. On opening it displays eight immediate KPIs split into two areas: receivables (total open, overdue, customers with open balances, collected this month) and payables (total open to vendors, overdue, vendors with open balances, paid this month). Below the KPIs, individual report cards show the count of active entries for each area, so you can see at a glance where to focus without opening anything.
The receivables reports cover four distinct angles. The Open Invoices report lists all posted invoices with a positive remaining balance: each row shows invoice number, customer, posting date, due date, original amount, paid amount, remaining amount, status (Open or Overdue), and days overdue. You can filter by customer, due date range, and status, sort by due date, remaining amount, or customer, and paginate at 10, 20, or 50 rows. The Overdue Invoices report is the read-only filtered version of the same columns with the status locked to Overdue — designed for fast follow-up on late receivables without setting filters each time.
The Aging by Customer report distributes each customer's total open balance into time buckets: Current (not yet due), 1-30 days, 31-60 days, 61-90 days, and 90+ days. Each row also shows the count of open invoices and a drill-down link that opens that customer's invoices directly in the Open Invoices report. You can sort by total amount, by individual bucket, or by customer name. The Top 10 Customers report ranks customers by sales volume with columns for invoices issued, total sales, total collected, and total open — useful for understanding which customers generate the most revenue and which carry the highest credit exposure.
The payables reports mirror the same structure on the purchasing side: Open Vendor Invoices, Overdue Vendor Invoices, and Aging by Vendor, with the same columns, filters, and sorting options but applied to posted purchase invoices. This gives symmetric visibility into receivables and payables without switching to external tools.
All reports share three output actions: export to Excel for external processing, open PDF for a printable document with company header and active filter summary, and print via browser dialog. Data is calculated in real time from the workspace loaded in memory — no sync, no loading: what you see reflects the exact current state of documents in the workspace. If you apply a filter before exporting, the export respects the active filters.
Because Quote2Invoice keeps all workspace data in the browser's local storage, the WZIP file is the only reliable copy of your work. Treat exporting it as pressing Save.
Local storage is not permanent. Clearing the browser cache, switching to a private window, or opening a different browser on the same computer all start with an empty workspace. The moment you close a session without exporting, that session's changes exist only until the browser clears them. Export WZIP is the equivalent of a Save button — the habit of exporting at the end of every working session is what keeps your data safe.
The WZIP file is a compressed archive that contains everything in your workspace: company settings (including your uploaded logo), customers, vendors, items, sales and purchase quotes, orders, provisional invoices, posted invoices, ledger entries, and all registered payments. It also includes a manifest with the schema version, creation timestamp, and app version. What it does not contain is your login session or Supabase account data — those are separate. Importing a WZIP on a different account or a different browser restores workspace data completely, independently of the login identity.
To export, use the Export WZIP button in the top header of any active workspace page, or the Export WZIP button on the Setup page. The browser downloads a .wzip file to your default download folder. Rename it immediately with a date or session label — for example workspace-2026-04-30.wzip — so you can identify it later without opening it.
To reopen a saved workspace, you have three entry points. On the login screen, choose Import ZIP file to load a WZIP before entering the workspace. From the Setup page, use the Load WZIP button to replace the current workspace with a saved file. From any page within an active workspace, the header offers a file picker that does the same. In all cases, importing a WZIP is a full replacement: it erases the current workspace and loads the file's contents. There is no merge and no undo — if you have unsaved changes in the current session, export first.
For version management, keep at least two copies of your WZIP at any time: the current working file and a backup from the previous session. A simple naming convention like workspace-YYYY-MM-DD.wzip makes it easy to find the right version without tools. Store copies in at least two locations — for example your downloads folder and a synced cloud folder (Google Drive, Dropbox, iCloud) or a USB drive. When switching to a new computer or browser, always import the most recent WZIP first; never assume that browser state from a previous device has carried over.
Simple habits that make the product much more reliable in daily work.
WZIP (short for Workspace ZIP) is the portable container for your work. It is not a backup of browser state — it is the workspace itself, in a structured format designed to be moved, stored, and reopened anywhere.
Technically, a WZIP is a standard ZIP archive with a .wzip extension. It can be opened with any ZIP utility for inspection, though manually editing its contents is not supported and will break import compatibility. The .wzip extension signals that this is a structured workspace container, not a generic compressed archive.
Inside the archive, each entity type has its own JSON file: company settings, customers, vendors, items, sales and purchase quotes, sales and purchase orders, provisional invoices, posted invoices, ledger entries, and payments. A manifest file records the schema version, the creation timestamp, the app version that produced the file, and the list of files inside. If you have uploaded a company logo, it is stored as a binary asset inside the archive — embedded directly, not linked externally.
The schema version visible in the FAQ badge on this page identifies the current WZIP format. This number increments whenever the data structure changes in a way that affects compatibility. When you import a WZIP, the app checks this version. Files created with an older schema are migrated automatically where possible. Files produced by a newer version of the app than the one you are running will not load and will show a version mismatch error.
The WZIP is the single source of truth for the workspace. The browser's local storage is a working copy that exists between exports — convenient, but not durable. If the browser resets or you switch devices, the WZIP is the authoritative record. Importing it always overwrites whatever is currently in the browser, with no merge and no conflict resolution. Keep it current.
Short answers to the most common questions.
Yes. WZIP can live on a USB drive: plug it in, open the browser, load the file, and continue with your workspace.
No. The product is file-based and local-first: data stays in the browser until you export the WZIP file.
No. This product is designed for people who do not want a full ERP and do not have dedicated infrastructure.
All unsaved workspace data is lost. The browser cache is the only place where your workspace lives between sessions — clearing it is equivalent to deleting the workspace. Always export a WZIP before clearing the cache or performing any browser maintenance.
A provisional invoice is a working document: it is fully editable and does not yet appear in receivables or payables reports. A posted invoice is permanent: once posted, no field can be changed and it immediately creates the ledger entry that feeds aging reports, open invoice lists, and payment tracking.
No. Posted invoices are intentionally immutable — this is what makes them a reliable accounting record. If data is incorrect, the practical path is to handle the difference through a payment adjustment or by issuing a corrective document and noting the change in the next provisional invoice.
When registering a payment — from Sales > Customer Payments or directly from the posted invoice — adjust the amount field to the partial amount received. The invoice status stays Open until the full balance is covered. Each partial payment is recorded in the ledger and the remaining amount updates in real time across all reports.
Yes. Each WZIP file is a complete, independent workspace. To work with multiple workspaces — for example one per company or one per fiscal year — keep separate WZIP files and import the relevant one when needed. Importing replaces the active workspace entirely, so export the current one before switching.
The app runs in any modern browser, including mobile browsers. However, it is designed for desktop use: document forms, tables, and reports are optimized for larger screens. On a phone or small tablet, navigation and data entry may be less comfortable, particularly for multi-line documents.